Hello friends!
Sorry for being absent for several days. I've been working on our forum and we now have a new blog! What was www.kitchencando.blogspot.com is now www.hummingbirdhilljams.blogspot.com. I've asked my niece, Abi to help me spruce it up and enable more features. She's so smart!
The change is primarily to reflect the direction of our mission. Over the course of the next few weeks you will see a new banner, more features, new recipes, as well as more posts regarding Hummingbird Hill Jams. I don't want to spoil the surprise so I'll stop here. Check back often, and as always I welcome your comments.
Remember, food bridges people!
Please click here to be redirected to www.hummingbirdhilljams.blogspot.com
Wednesday, September 11, 2013
Friday, September 6, 2013
Chimichurri
 |
| Chopped parsley, oregano and garlic |
 |
| Salt, white wine vinegar, olive oil and pepper flakes |
 |
| Prepared Chimichurri
One of my favorite go-to condiments is Chimichurri. This is an Argentinean sauce made from herbs,
oil and vinegar, and is always served alongside grilled meats. This sauce is vibrant both in taste and
appearance. No need for extraneous rubs
or marinades. Chimichurri enhances the
flavor of meat cooked over an open fire with its herbaceousness that brings to
mind the grass that the steer was raised on.
Chimichurri
Ingredients:
1 cup firmly packed fresh parsley, trimmed of thick stems
3-4 garlic cloves
2 tablespoons fresh oregano
½ cup olive oil
2 tablespoons red or white wine vinegar
1 teaspoon sea salt
¼ teaspoon red pepper flakes
1.
Finely
chop the parsley, oregano and garlic, or process in a food processor. Transfer to bowl.
2.
Stir in the olive oil, vinegar, salt and red
pepper flakes. Adjust seasonings.
3.
Serve immediately or refrigerate. If chilled, return to room temperature before
serving. May keep refrigerated for 1-2
days.
***************************
I first had Chimichurri years ago when some co-workers and I
went to an Argentinean restaurant for lunch.
I ordered sweetbreads and they ordered other grilled meats. All of the tables had bowls of this bright
green sauce. I didn’t care much for the
sweetbreads but I fell in love with the sauce!
It was good on everything – even bread.
So we looked on the internet and found several versions. Some ditched the oregano, some had other
herbs. But the one constant ingredient
is the parsley. As with most recipes,
you can personalize this by adjusting the vinegar or the pepper flakes. But no matter how you make it, it will be
good. Chimichurri wakes up the flavor of
anything you dip in it.
What would you dip in Chimichurri?
|
Tuesday, September 3, 2013
Hong You
 |
| Ingredients for Hong You |
 |
| Sichuan peppercorns |

Chile de arbol
 |
| Crushed ginger, garlic and cinammon |
 |
| Combining soy sauce and sugar mixture with pepper mixture |
 |
| Spices cooking in the oil. |
 |
| Oil and spices poured into bowl with peppers. |
 |
| Letting Hong You cool in bowl. |
 |
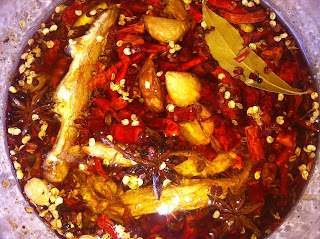
| Hong You ready for storage.
I love spicy food and I constantly look for new sources of
heat. So when my March issue of Saveur
came I was elated to find that one of the feature articles was about Sichuan
food. I have long heard of this spicy
cuisine of China, and have eaten Mapo Tofu many, many times. I also make Spicy Eggplant often. But this article by Matt Gross gave so much
information, and better yet, mouth-watering recipes. An important ingredient in most Sichuan
dishes is Hong You which I was very eager to make.
Hong You (Sichuan Red Chile Oil)
INGREDIENTS
2 cups canola oil
4 star anise 3 cloves garlic, smashed 3 cao guo or black cardamom pods 3 whole cloves 2 bay leaves 1 stick cinnamon, broken in half 1 3" piece ginger, smashed 1 cup (about 32) chiles de árbol, stemmed and chopped 3 tbsp. Sichuan peppercorns 1 tbsp. light soy sauce ½ tsp. kosher salt
INSTRUCTIONS
Heat oil, star anise, garlic, cardamom,
cloves, bay, cinnamon, and ginger in a 2-qt. saucepan over medium heat; cook,
stirring occasionally, until garlic is golden, 15–20 minutes. Transfer to a
1-qt. glass jar with chiles, peppercorns, soy, and salt; let cool to room
temperature. Using a slotted spoon, remove and discard garlic and ginger; seal
jar and let sit at least 24 hours. To use, strain oil, discarding solids. Store
refrigerated up to 3 months.
*******************
Let’s talk about the ingredients. Garlic, cloves, bay leaves, cinnamon stick,
ginger, chile de arbol and soy sauce are pretty easy to find; most grocery stores
carry them. That leaves only the black
cardamom pods and Sichuan peppercorns.
I’ll be honest with you – I couldn’t find the black cardamom
pods. I live in the Los Angeles area and
have easy access to vast numbers of Asian grocery stores but I didn’t find
it. The store employees didn’t know what
“black cardamom” was, and I was probably mispronouncing “cao guo”. Not wanting to delay trying the recipe any
longer, I used green cardamom. I later
learned that “cao guo” is one of two kinds of black cardamom. The smaller variety is used in Indian and
Pakistani dishes, mainly in sweets. The
larger of the two, cao guo, is used in Chinese and Vietnamese dishes. This one has a smoky aroma and flavor because
it is dried over an open flame.
The Sichuan peppercorn is not even remotely related to
peppers. In fact, it is the dried rinds
of tiny fruits from a small thorny tree in the citrus family known as prickly
ash, according to Karen Shimizu (Saveur, March 2013). Shimizu adds that Sichuan peppercorns are
responsible for the buzzing, tingling sensation that is one of Sichuan cuisine’s
most distinguished characteristics. So
you get the tingling from the Sichuan peppercorns, and the spiciness from the
chile. Because they affect different
systems of our nerves, we get dual sensations when eating Sichuanese food. It’s kind of like getting a punch and a kick!
So after having made it and letting it steep overnight, I couldn’t
wait to pour it over my fried fish and steamed rice. I used only the oil like the recipe
said. I did get the punch and the kick –
but it was not as strong as I had imagined.
I guess I was expecting it to be a condiment like my regular Hot Chile
Oil (Heat 1 cup of peanut oil to 225° - 240°F, remove from heat, dump 1 cup of
crushed peppers.), but it wasn’t. As the
recipes in Saveur indicate, Hong You is used to cook food.
While I am still a little disappointed with the not-so-spicy
Hong You as a condiment, I do have it to cook with. I am looking forward to using it in
Stir-fried Pork Belly with Chinese Chives or Triple-Cooked Spareribs with
Chiles!
Have you ever tried a recipe and it was not what you were
expecting? What did you do with it?
|
Monday, September 2, 2013
Lemon Chicken
 |
| Pounded chicken tenderloin ready to be dredged in flour, salt and pepper. |
 |
| Sauteing chicken tenderloins. |

Lemon slices and capers sautéing in butter.
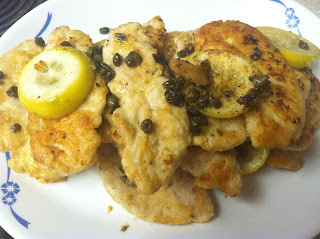 |
| Lemon Chicken |
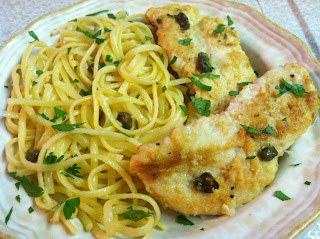 |
| Lemon Chicken with Linguini |
Several years ago my friend Cynthia and I went to an Italian restaurant for dinner. I can’t remember the name of the restaurant or what she ordered. What I do remember is the simple but delicious dish I ordered.
As soon as I tasted my food that night I fell in love with the simplicity and taste of this dish. I had to have it again! Armed with just a memory of how it tasted I set about to recreate it. This has since become one of my daughter’s favorite.
Lemon Chicken with Linguini
Ingredients:
2 ½ lbs chicken tenderloins
2 C flour
1 teaspoon salt
1 teaspoon pepper
¼ - ½ C olive oil
5 tablespoons butter, divided
3 lemons, sliced cross-wise into ¼” discs, divided
2 tablespoons capers
½ teaspoon minced garlic
1 lb linguini cooked according to package directions, reserving 1 cup of cooking water
¼ C minced Italian parsley (optional)
Directions:
1. Wash chicken tenderloins then pat dry. Place 3 inside a plastic bag. Place plastic bag on top of chopping board. Gently pound tenderloins with a rolling pin or small frying pan until they are ¼” thick. Be careful to keep them intact. Continue with the rest of the tenderloins.
2. Heat oil in skillet on medium heat.
3. Combine flour, salt and pepper in a shallow dish. Dredge tenderloins in the flour and shake off excess. Saute tenderloins until they are pale to golden brown. Continue to saute in batches and set aside.
4. In same skillet, add 2 tablespoons butter and sauté half of the lemon slices and half of the capers, about 3 minutes. Using wooden spoon gently mash lemon pulp from the slices to express juice. Add cooked tenderloins and stir gently to coat, about 3 minutes. Transfer to platter and keep them warm.
5. Wipe skillet with a paper towel then add garlic, remaining butter, lemon slices and capers. Saute about 3 minutes, gently mashing lemon pulp to express juice. Add cooked pasta and gently toss to coat. Add ¾ cup pasta cooking water to create a thin sauce. Add more if pasta seems dry or if you want more sauce. Toss to coat again.
6. Serve pasta and chicken tenderloins together. Garnish with minced Italian parsley.
******************
I use chicken tenderloins because it is more delicate and easier to pound. That said, care is needed from pounding too hard. We are trying to make a chicken cutlet, not chicken tenders! Remember, the meat must remain intact.
“Cooking water” refers to the water the pasta is cooking in. When the pasta has finished cooking, reserve a cup of the water and set aside. And then drain the pasta into a colander. Why? The cooking water contains starch and salt (provided you added salt in the first place, and which is highly recommended). This cooking water will help to emulsify and bind your sauce, or help to thin your sauce. In our Lemon Chicken dish, the cooking water will emulsify our sauce by binding with the oil and butter to create a silky coating for the pasta. It is better than plain water because it contains starch which acts as a thickener. You may use any kind of pasta you want.
Notice that I did not say to add salt to the dish. This is because there is salt in the flour mixture, salt in the butter, lots of salt in the capers, and salt in the cooking water. Of course you may add salt if you wish.
Speaking of capers, what are capers? According to Huffington Post, tiny capers are picked from a shrub-like bush (Capparis spinosa), long before the buds ever flower. The capers are then dried in the sun and later brined or packed in salt. Sometimes capers are allowed to mature to a fruit about the size of an olive. These are sold as caper berries and are brined to be eaten like pickles or olives. It's quite common to see them included in an antipasti platter. Capers aren't new to the culinary scene -- they've actually been around since ancient times. They're grown in parts of Asia, the Middle East and the Mediterranean region, including north Africa, southern Europe and Turkey. Capers are also grown in California.
Why add butter to oil? Simply because it adds luxuriousness to the dish.
What restaurant dish have you recreated at home?
Saturday, August 31, 2013
Roast Tomato Soup
 |
| Tomatoes, onions, garlic, oil, salt and pepper |
 |
| Roasted tomatoes |
 |
| Roasted tomatoes with bay leaves and stock |
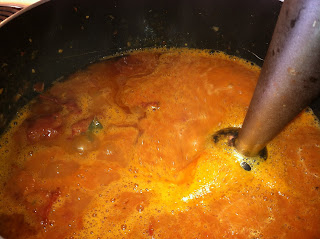 |
| Using an immersion blender |
 |
| Roasted Tomato Soup with cream and garnished with roasted grape tomato
My plants bearing medium-large tomatoes are in full
bloom. So with an abundance of tomatoes
but not enough to can, Roasted Tomato Soup sounded good. When I Googled “roasted tomato soup”, this
one sounded best to me. This is adapted
from Tyler Florence’s recipe on www.foodnetwork.com.
Roasted Tomato Soup
Ingredients:
2 ½ lbs fresh tomatoes (mix of plum, heirloom grape)
6 cloves of garlic, crushed
2 small onions, sliced
½ C vegetable oil
Salt and pepper
1 quart chicken or vegetable stock
2 bay leaves
4 tablespoons butter
½ C chopped fresh basil leaves (optional)
¾ C heavy cream (optional)
Preheat oven to 450°F.
Wash, core and cut the tomatoes into
halves. Spread the tomatoes, garlic cloves and onions onto a baking tray. If
using vine cherry tomatoes for garnish, add them as well, leaving them whole
and on the vine. Drizzle with 1/2 cup of oil and season with salt and pepper.
Roast for 20 to 30 minutes, or until caramelized.
Remove
roasted tomatoes, garlic and onion from the oven and transfer to a large stock
pot (set aside the roasted vine tomatoes for later). Add 3/4 of the stock, bay
leaves, and butter. Bring to a boil, reduce heat and simmer for 15 to 20
minutes or until liquid has reduced by about a third.
Wash
and dry basil leaves, if using, and add to the pot. Use an immersion blender to
puree the soup until smooth. Return soup to low heat, adjust consistency with
remaining stock, if necessary. Season to taste with salt and freshly ground
black pepper. Garnish in bowl with a splash of heavy cream and 3 or 4 roasted
vine cherry tomatoes.
**********************
OMG!
This was quite a revelation because up until a few years ago I was not fond of
tomatoes, raw or cooked. Tomato soup
sounded and looked like water-downed catsup, or tomato juice at best. But this soup! This soup was so rich and delicious!! My family and I couldn’t get enough of it. Roasting not only concentrates the flavor of
the tomato but adds to it by way of caramelization.
As
I said above, this recipe is adapted from Tyler Florence’s recipe. For instance, I used vegetable broth instead
of chicken broth. This did not make a
difference in the flavor because the outcome was rich and robust. I also substituted sage for basil simply because
I did not have basil. Therefore you can
add practically any other herb you have on hand such as oregano, thyme,
tarragon, etc. Just be sure to adjust
the amount to your taste. And finally, I
only added the cream as a garnish to maintain the soup’s tomato-ey color and
flavor.
If
you don’t have an immersion blender, you can transfer the soup to a regular
blender or food processor to puree it.
Then transfer it back to the pot to finish cooking.
Since
I harvested more tomatoes the other day, and can’t possibly use them all, I
roasted enough for 3 more batches of this soup.
After cooling the roasted tomatoes I transferred them to a freezer-safe
container. This way whenever I want Roasted Tomato Soup in the fall or winter,
all I have to do is defrost a packet, add broth and finish off the recipe. This is a quick way to preserve my tomatoes without
having to can them or take up a lot of freezer space.
So
when are you going to make this soup?
|
Thursday, August 29, 2013
Roasted Cauliflower


It was cool and foggy where we live last week and I suddenly
got a craving for roasted vegetables. So
I added potatoes and carrots to my roasted chicken. I also made Roasted Cauliflower for my
vegetarian husband.
Roasted Cauliflower
with Plum Sage Jam
Ingredients:
1 ½
teaspoons roasted garlic
1 ½ tablespoons Plum Sage jam
2 teaspoons lime juice
5 tablespoons olive oil
1 teaspoon salt
1 teaspoon minced fresh sage
1 teaspoon minced fresh mint
1 large head cauliflower
Preheat oven to 400°F.
Rack should be at the lowest level.
Grease bottom of baking pan.
In a small bowl whisk together roasted garlic, jam, and lime
juice. Slowly pour olive oil into
mixture until an emulsion is formed. Add
sage, mint and salt. Set dressing aside.
Trim cauliflower of leaves.
Slice into “steaks” about ¾- inches thick. Place slices in baking pan in a single
layer. Bake until edges of cauliflower turn
a little brown, about 25 minutes.
Drizzle jam dressing over cauliflower slices. With rack still at the lowest level, change
oven setting to broil. Broil until
cauliflower has browned some more and jam has caramelized, 5-10 minutes.
*********************
Roasted garlic is made by taking an entire head of garlic,
cutting it half crosswise and pouring about 1 tablespoon olive oil on it. Roast in 350°F until garlic is tender about
45 minutes. When cool, squeeze softened
garlic into a bowl. Add oil from
roasting pan and store refrigerated.
Roasting any vegetable concentrates its flavor. Doing so to cauliflower which is kind of
bland, gives it a rich, smoky flavor. By
roasting the jam dressing with the cauliflower, you will experience an
explosion of flavor! Lime juice tempers
the sweetness of the jam, fresh sage heightens the earthiness of the herb in
the jam, and fresh mint adds a refreshing finish.
This dressing may also be used in salads or as a marinade
for roasted pork loin. What would you
use it with?
Tuesday, August 27, 2013
Snow Peas with Tofu
 |
| Chinese rice wine |
 |
| Chinese rice wine label |
 |
| Soy sauce |
 |
| Sesame seed oil |
 |
| Snow Peas with Tofu
I was in the grocery and bought some really fresh snow
peas. Initially I thought of stir frying
them with a bunch of other vegetables but instead opted for a simpler
dish.
Snow Peas with Tofu
Ingredients:
3 tablespoons vegetable oil
1 teaspoon minced ginger
1 C sliced green onions
1 lb deep-fried tofu
1 lb snow peas, trimmed
½ C Chinese rice wine
¼ C soy sauce
Salt and pepper to taste
1 tablespoon sesame seed oil (optional)
Saute ginger and green onions in oil on medium heat for 2
minutes. Add deep-fried tofu, stirring
occasionally, 2 minutes. Add snow peas,
toss to coat. Add rice wine and soy
sauce. Season with salt and pepper. Cook until snow peas are crisp-tender, about 3
minutes. Add sesame oil just before serving.
************************
This dish would make a great vegetarian meal served with some
rice, or part of a meal with meat. It is
very pleasing to the eye with the vibrant green snow peas and golden deep-fried
tofu. It is fragrant from the
combination of green onions, ginger, soy sauce and rice wine. The snow peas provide a nice crunch from not
being cooked too long, and the puffy deep-fried tofu is crisp on the outside
and soft on the inside. The addition of
sesame oil brings everything together and lends a luxurious silkiness to the
dish.
As with any stir-fry
you can jazz up this dish with mouse ear mushrooms, cashew nuts, canned baby
corn, bamboo shoots, sliced water chestnuts, sliced carrots, pieces of dried
chile de arbol, oyster sauce, etc. The possibilities are almost endless! Just be sure to cut meat or vegetables
bite-sized so they cook quickly and evenly.
Deep-fried tofu can be found in most Asian markets. You can also deep-fry it yourself.
Let me know if you need help finding some of the
ingredients. What will you put in your
next stir-fry?
|
Monday, August 26, 2013
Furusato Korean BBQ
 |
| Furusato Korean BBQ |
 |
| Menu |
 |
| Banchan |
 |
| Slices of beef brisket |
 |
| Marinated chicken |
 |
| Meat cooking on the grill. |
 |
| My plate.
I thought I would post something different today. My daughter and I visited Furusato Korean BBQ
located in Gardena, CA. As in a typical
Korean BBQ restaurant the diners cook their own meat on a grill built into the
table.
Shortly after being seated we were given a bowl of salad
greens with a thin soy sauce dressing, a saucer of kimchi (fermented cabbage, salt and chile), a saucer of marinated
cucumber, seasoned soy bean sprouts, and a saucer of sweet potatoes. There are many different kinds of kimchi and sides which are collectively
called banchan. We each got a bowl of steamed rice, and 2
dipping sauces (a thin soy sauce and seasoned oil). There was also a plate of
rice paper. You may request sliced
onions and hot sauce. Apart from water,
you may order tea, soda or beer. We
weren’t that hungry so we ordered (A).
Some BBQ restaurants have an all-you-can-eat salad/side
dishes bar. One of the things that sets
Furusato apart is that they only have 2 items on their menu: (A) $9.99 person,
and (B) $16.99 per person. (A) gets you
ultra-thin slices of beef brisket, slices of pork belly which is a bit thicker
than thick-cut bacon, and marinated chicken.
On the other hand, (B) gets you the three items mentioned above plus: 1
Black Angus sirloin steak (1 steak /2 people max), Black Angus marinated beef
ribs, marinated beef, beef tongue, spicy marinated pork, beef small intestines,
seasoned webfoot octopus and seasoned sea mussels. You can get unlimited quantities of everything
except the Black Angus sirloin steak.
Use the tongs to transfer raw meat onto the grill. Use your chopsticks to pick up cooked meat
from the grill.
The crisp salad greens and banchan whetted our appetite.
As soon as the meat arrived we transferred some to the hot grill. The meat started to sizzle and soon the color
started to turn. The smell of cooking
meat was in the air. This was a feast
for the senses! I dipped my meat into
the oil seasoned with salt, but my daughter prefers the sweetish soy-based
sauce. The beef was very tender and was
wonderful adorned with the simplicity of oil and salt. The pork was good but a little less tender
than the beef. It’s a good thing it is
given to you already cut up into bite-size pieces. The chicken thigh meat takes longest to cook
but is equally tender and flavorful. After
devouring the first round the server asked if we wanted more. We ate the second plates of meat at a more
leisurely pace.
Furusato is a no-frills kind of place. Parking is extremely limited especially
during their peak hours. You may have to
share your table with other diners.
Service may be a little slow and the servers may be a little
brusque. This place is popular with the
younger crowd and tends to get noisy. It’s
more fun when you go there with a group of people. They are open Monday through Saturday 11 AM –
12 midnight, and Sunday 11 AM – 11 PM.
Do you think you would order (A) or (B)? |
Thursday, August 22, 2013
Tomato Frittata
 |
| Leftover tomatoes |
 |
| Sliced tomatoes in skillet with a little oil. |
 |
| Tomatoes with egg mixture and chopped chives. |
 |
| Nice and fluffy |
 |
| Crispy edge
It's been 3 days since I picked a
basketful of tomatoes from the backyard and already there are a lot of ripe
ones out there. Not ready to go into
gardening mode at 11:30 this morning, I just got the ones that fell off the
vine. Just then my mother-in-law walked
into the kitchen looking to see what she could have for lunch. I knew just the thing!
As I was packing my daughter's
lunch this morning, I noticed I had a lot of eggs in the fridge. And
the leftover roasted tomatoes for the Pan Fried Scamorza with Roasted
Tomatoes recipe over the weekend. And I
still had a lot of tomatoes on the kitchen counter. And more were coming. I got the already-roasted tomato halves and
cut them into half. This is my recipe
for Tomato Frittata:
1.
Pre-heat broiler.
2. Heat 2 T oil in an oven-proof skillet. Add 1 ½ C sliced tomatoes and cook 3 minutes. 3. Beat 10 eggs and pour into the skillet. Use a spatula to move tomatoes around so that they are evenly distributed. Season with salt and pepper. Add chopped chives. 4. When egg is half-way set, transfer to broiler and cook until golden brown on top. 5. Slice into wedges and serve with crusty bread or salad.
So my in-laws and I had Tomato
Frittata for lunch with lightly toasted Rosemary Olive Oil Bread. It was light
yet filling. The tender egg backdrop was
perfect for the sweet robust flavor of the tomatoes. And the bread provided a satisfying
crunch.
Frittata is an egg-based dish from
Italy. It is like an omelette with the
addition of various vegetables, meats or cheese. It may be flavored with herbs. An alternative to tomatoes is sliced zucchini,
peppers or whatever vegetable you have on hand.
You can also add meat or cheese or a combination of ingredients for a
heartier meal. Salumi may also be served
on the side. As long as you have eggs
this would be a good dish to make when you want to use up leftovers.
What do you do with leftover sliced tomatoes? |
Tuesday, August 20, 2013
Plum Sage Jam
 |
| Jars of Plum Jam with a sprig of sage. |
 |
| Bits of fruit and sage are visible in the jam spread on a slice of bread.
Back in June we went on a family vacation/reunion. We met up with my two sisters-in-law and
their families near Yosemite National Park in northern California. Jeanne brought vegetables (zucchini,
tomatoes, onions and peppers) from her garden.
She also brought apricots, nectarines and plums from her in-laws’
orchard. I brought home fruit that we
didn’t eat and promptly froze them.
Since then I’ve made several batches of jam. But there’s still almost an entire shelf of
fruit in our freezer so I decided to use some today.
I decided to make something a little different by adding an
herb. Now, I’m not usually enamored of
sweet and savory together so I was curious how this would turn out. I got the idea upon watching Giada De
Laurentis make a berry jam with thyme.
But I think I hit the jackpot when I stumbled on a blog called Northwest Edible Life by Erica. She has a downloadable Signature Jam Flavor Maker Chart
which suggests pairing different kinds of fruit with herbs, spices and
liquor. Since I was using plum today I
chose sage as the flavor to pair with. Erica’s
chart says to use ¼ tsp of “dry zing” (her term for dry flavor additives). But since I was using 4 lbs of fruit and 8
cups of sugar I thought I could stand to use more.
Here is the recipe for Plum
Sage Jam:
6 cups prepared fruit (about 4 lb. fully ripe plums)
1/2 cup water
1 box SURE-JELL Fruit Pectin
1/2 tsp. butter or margarine
8 cups sugar, measured into separate bow (See tip below.)
2-3 tsp. minced fresh sage
Bring boiling-water canner, half-full with water, to simmer.
Wash jars and screw bands in hot soapy water; rinse with warm water. Pour
boiling water over flat lids in saucepan off the heat. Let stand in hot water
until ready to use. Drain well before filling.
Pit plums. Do not peel. Finely chop or grind fruit. Place
fruit in saucepan; add water. Bring to boil. Reduce heat; cover and simmer 5
min. Measure exactly 6 cups prepared fruit into 6- or 8-qt. saucepot.
Stir pectin into fruit in saucepot. Add butter to reduce
foaming. Add sage. Bring mixture to full
rolling boil (a boil that doesn't stop bubbling when stirred) on high heat,
stirring constantly. Stir in sugar. Return to full rolling boil and boil
exactly 1 min., stirring constantly. Remove from heat. Skim off any foam with
metal spoon.
Ladle immediately into prepared jars, filling to within 1/8
inch of tops. Wipe jar rims and threads. Cover with two piece lids. Screw bands
tightly. Place jars on elevated rack in canner. Lower rack into canner. (Water
must cover jars by 1 to 2 inches; add boiling water if needed.) Cover; bring
water to gentle boil. Process 10 min. Remove jars and place upright on a towel
to cool completely. After jars cool, check seals by pressing middles of lids
with finger. (If lid springs back, lid is not sealed and refrigeration is
necessary.)
How to Measure Precisely
To get exact level cup measures of sugar, spoon sugar into
dry metal or plastic measuring cups, then level by scraping excess sugar from
top of cup with a straight-edged knife.
**********
This recipe (adapted from the Kraft website) yielded 8 8-oz
jars, and 7 4-oz jars of jam, or roughly 92 oz of jam. Plum jam makes a lovely spread with its jewel
color. In the picture above you can see
bits of fruit and minced sage. The taste
is fantastic! There’s tartness from the plums and sweetness from the
sugar, and then the hint of sage in the background. The sage is mild enough as to not overpower
the rest of the flavors. Yes, I think I’m
definitely on to something here.
What flavors would you pair together?
|
Monday, August 19, 2013
Siobhan's Birthday Luncheon
 |
| Sliced tomatoes with oregano sprigs ready to be roasted. |
 |
| Scamorza |
 |
| Deli sandwiches |
 |
| Pan Fried Scamorza with Roasted Tomatoes |
 |
| Polenta Elisa |
 |
| Stuffed Mushrooms Caps |
 |
| Jam Cake
In honor of my daughter’s 14th birthday, we had a
luncheon for her, and invited family and some friends. She decided to have Italian food as she is
part Italian. As I mentioned in an
earlier post, I was at my local Costco when Franco & Angelo (http://www.angeloandfranco.com/) was
doing a demo on their various mozzarella products. So I used their products in some of the
following dishes:
Assorted Olives –
Store bought black olives and marinated Italian green olives.
Fried Pedron and
Cubanelle Peppers – I grow these which are similar to Italian frying
peppers. Fry in olive oil until blistered in spots. Sprinkle with kosher
salt.
Tomatoes with
Ciliegine – Ciliegine is cherry-sized
mozzarella made from 100% whole cow’s milk.
On a riff on Caprese Salad, I combined ciliegine with mixed grape
tomatoes, extra virgin olive oil, Italian herbs, kosher salt and fresh-ground
pepper.
Stuffed Mushroom Caps
– I combined the mushroom stems with softened cottage cheese, walnut pieces, onion
powder, garlic salt and kosher salt.
Puree in a food processor, and stuff the mushroom caps with the
mixture. Bake at 350°F until golden
brown.
Pan Fried Scamorza
with Roasted Tomatoes – Scamorza
is a plastic
(or stretched) curd cheese, in which the fresh curd matures in its own whey for
several hours to allow acidity to develop by the process of lactose
being converted to lactic acid. Artisanal
cheesemakers generally form the cheese into a round shape, and then tie a
string around the mass one third of the distance from the top, and hang to dry.
The resulting shape is pear-like. This is sometimes referred to as
"strangling" the cheese. The
recipe I used said to slice the scamorza and pan-fry them on high heat until they
start to melt. Well, my scamorza slices
started to melt immediately. They did
not turn out like the picture in the cookbook which was slices with
well-defined borders; my melted slices were like blobs, but tasted good
nevertheless. So I placed the scamorza
on a bed of spinach (you could use any salad green like arugula, dandelion,
etc.) and topped with roasted tomatoes (sliced and roasted with salt, sugar,
olive oil and oregano sprigs).
Deli Sandwiches –
On a sandwich roll, I placed a slice of mozzarella, mortadella with pistachio,
sopressata and capicola, sliced tomatoes and baby artisanal lettuces. You can use any combination of salumi and
greens. Then I added Italian dressing
using a squirt bottle to the sandwich.
The vegetarian version featured grilled sliced eggplants/red bell
peppers/scallions instead of meat.
Linguini with Pesto
– There are different kinds of pesto but perhaps the most popular in the U.S.
is the green Pesto alla Genovese. It is made from garlic cloves, pine nuts,
fresh basil leaves, extra virgin olive oil, coarse salt, grated
Parmigiano-Reggiano and Pecorino-Romano cheeses all ground up traditionally
using a marble mortar and wooden pestle.
A food processor may be used instead for convenience. It may be stored refrigerated in an air-tight
container by adding extra virgin olive oil on top to prevent discoloration. Pesto must be served room temperature on top
of, or mixed with hot pasta.
Polenta Elisa – Polenta is cornmeal that once boiled
into a porridge, can be eaten as is, or baked, grilled or fried. Make one recipe of polenta by boiling 3 cups
of water and 1 cup of milk. Slowly whisk
in 1 cup of polenta and cook until the mixture thickens and the polenta is
tender. Season lightly with salt. Pour into a greased casserole dish. I topped it with sliced Provolone as I
couldn’t find Dolce di latte. Make
another recipe of polenta and pour on top of the first layer, and add more sliced
cheese. In another saucepan, sauté
coarsely chopped garlic and minced fresh sage in butter until lightly
browned. Pour on top of
polenta/cheese. Bake until browned in
spots. A denser polenta may be made by
using 3 cups of liquid; this kind of polenta may be sliced and fried or
grilled.
Jam Cake – I
suggested getting pound cake, filling it with Meyer Lemon Curd and dusting with
powdered sugar. But my daughter wanted a
French vanilla cake instead. So we made
(2) 13x9” cakes and filled it with Triple Berry Jam. I make both the Meyer Lemon Curd and Triple
Berry Jam.
Let me know if you would like me to post details or actual
recipes of any of the above dishes, or if you want me to give more information
about a specific ingredient. In future
posts I will tell you more about my jams and other DIY food projects! I hope you enjoyed this description of my
dishes. Buon appetito!
|
Subscribe to:
Posts (Atom)